[ 설치 환경 ]
| OS | Centos 7.6 |
| Apache 2.4 | |
| Tomcat 8 | |
3. tomcat 8 설치
tomcat 설치 링크 tomcat.apache.org/download-70.cgi
Apache Downloads
We suggest the following site for your download: https://dlcdn.apache.org/ Alternate download locations are suggested below. It is essential that you verify the integrity of the downloaded file using the PGP signature (.asc file) or a hash (.md5 or .sha* f
tomcat.apache.org
3-1. tomcat 7 설치 및 실행
wget https://dlcdn.apache.org/tomcat/tomcat-8/v8.5.77/bin/apache-tomcat-8.5.77.tar.gz --no-check-certificate
tar xvfz apache-tomcat-8.5.77.tar.gz
cp -rf apache-tomcat-8.5.77 /opt/tomcat

# tomcat 실행
/opt/tomcat/bin/startup.sh
Using CATALINA_BASE:   /opt/tomcat
Using CATALINA_HOME:   /opt/tomcat
Using CATALINA_TMPDIR: /opt/tomcat/temp
Using JRE_HOME:        /usr
Using CLASSPATH:       /opt/tomcat/bin/bootstrap.jar:/opt/tomcat/bin/tomcat-juli.jar
Using CATALINA_OPTS:
Tomcat started.
3-2. 방화벽 설정
# 추가
firewall-cmd --permanent --zone=public --add-port=8080/tcp

# 적용
firewall-cmd --reload

# 확인
firewall-cmd --list-all
public (active)
  target: default
  icmp-block-inversion: no
  interfaces: eno1
  sources:
  services: ssh dhcpv6-client
  ports: 80/tcp 8080/tcp
  protocols:
  masquerade: no
  forward-ports:
  source-ports:
  icmp-blocks:
  rich rules:
4. mod_jk
연동 하기 전에 앞서 , 연동 방식의 대하여 간단하게 말씀드리겠습니다.
연동 방식은 mod_jk, mod_proxy, mod_prox_ajp 세가지 방식이 존재한다고 합니다.
저는 mod_jk 방식만을 다루겠습니다. mod_jk로 연동하는 경우가 많고, 나머지 2가지에 비해 URL 또는 컨텐츠별 설정이 쉽다고 합니다.
아파치와 톰캣을 연동하기 위해서는 mod-jk 모듈이 필요합니다.
mod_jk 모듈은 AJP 프로토콜( Apache Jserv Protocol)을 사용하여 아파치와 톰캣을 연동하는 플러그인입니다.
AJP 프로토콜은 웹 서버 뒤에 있는 애플리케이션 서버로부터 웹 서버로 들어오는 요청을 위임할 수 있는 바이너리 프로토콜이며, 주로 로드밸런싱에 사용됩니다.
AJP는 아파치가 웹서버와 외부서비스(톰캣)을 연동하기 위해 정한 규약(Protocol)
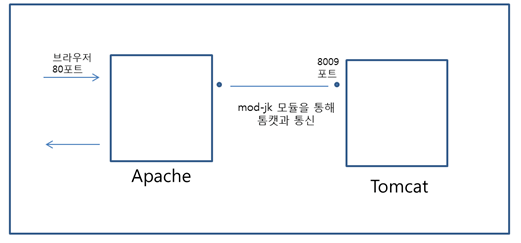
아파치는 이를 사용해 포트 80으로 들어오는 요청은 자신이 받고 이 요청 중 서블릿을 필요로 하는 요청은 톰캣에 넘겨 처리
아파치, 톰캣 연동을 위해 mod_jk라는 모듈을 사용->AJP Protocol을 사용하여 톰캣과 연동하기 위해 만들어진 모듈
1. 아파치 웹서버의 httpd.conf에 톰캣 연동을 위한 설정을 추가
2. 사용자의 브라우저는 아파치 웹서버(기본 포트 80)에 접속해 요청
3. 아파치 웹서버는 사용자의 요청이 톰캣에서 처리하도록 지정된 요청인지 확인하여 톰캣에서 처리해야하는 경우 아파치 웹 서버는 톰캣의 AJP포트(기본 8009 포트)에 접속해 요청을 전달
4. 톰캣은 아파치 웹서버로부터 요청을 받아 처리 후 처리 결과를 아파치 웹서버에 되돌려 준다
5. 아파치 웹서버는 톰캣으로부터 받은 처리 결과를 사용자에게 전송
4-1. mod_jk 설치
mod_jk 설치 tomcat.apache.org/download-connectors.cgi
Apache Tomcat® - Tomcat Connectors (mod_jk) Downloads
You must verify the integrity of the downloaded files. We provide OpenPGP signatures for every release file. This signature should be matched against the KEYS file which contains the OpenPGP keys of Tomcat's Release Managers. We also provide SHA512 checksu
tomcat.apache.org

4-2. mod_jk 컴파일
wget 뒤에 해당 링크 주소 복사하시면 됩니다.
해당 링크주소는 시간이 지나면 변하기 때문에 직접 들어가서 다운로드하시는 걸 추천드립니다.
tomcat-connectores → Tomcat과 외부 요청 connecting을 담당
cd /root/src
wget https://downloads.apache.org/tomcat/tomcat-connectors/jk/tomcat-connectors-1.2.48-src.tar.gz
tar xvfz tomcat-connectors-1.2.48-src.tar.gz
cd /root/src/tomcat-connectors-1.2.48-src/native
./configure --with-apxs=/opt/apache/bin/apxs
make && make install
4-3. workers.properties 생성
vim /opt/apache/conf/workers.properties
workers.apache_log=/opt/apache/logs
worker.list=applWorker
worker.statl.type=status
worker.applWorker.type=ajp13
worker.applWorker.host=localhost
worker.applWorker.port=8009
4-4. httpd.conf 설정 추가
<IfModule dir_module>
    DirectoryIndex index.jsp index.html index.htm index.php
</IfModule>

<IfModule mod_jk.c>
    JkWorkersFile "conf/workers.properties"
    JkLogFile "logs/mod_jk.log"
    JkLogLevel info
</IfModule>

Include conf/extra/httpd-vhosts.conf
Include conf/mod_jk.conf
4-5. vhost.conf 설정
vim /opt/apache/conf/extra/httpd-vhosts.conf
<VirtualHost *:80>
    DocumentRoot "/opt/apache/htdocs"
    ServerName 도메인
    ServerAlias www.도메인
    ErrorLog "logs/도메인-error_log"
    CustomLog "logs/도메인-access_log" common
 JKMount /* applWorker
</VirtualHost>
4-6. server.xml 설정
<Connector protocol="AJP/1.3"
               address="0.0.0.0"
               secretRequired="false"
               port="8009"
               redirectPort="8443" />
4-7. 연동 확인
브라우저에 도메인 입력시 고양이 화면이 출력되야 합니다.

이로서, apache, tomcat 설치 및 연동 완료되었습니다.
도움이 되셨다면 구독과 좋아요를
궁금한 내용이 있으시면 댓글 부탁드리겠습니다!!

'IT > Linux' 카테고리의 다른 글
| CentOS yum 설치 안될 때 (0) | 2022.05.20 |
|---|---|
| 리눅스 호스트네임 변경 (0) | 2022.04.16 |
| Apache + tomcat 8 설치 및 연동 (1) (0) | 2022.03.30 |
| Polkit 로컬 권한 상승 취약점(CVE-2021-4034) 조치 (0) | 2022.03.30 |
| 리눅스 패스워드 변경 (0) | 2022.03.30 |


최근댓글